- Tác giả

- Name
- Nguyễn Đức Xinh
- Ngày xuất bản
- Ngày xuất bản
Azure AD User Management: Hướng Dẫn Toàn Diện
Giới Thiệu về Azure Active Directory User Management
Azure Active Directory (Azure AD), hiện được gọi là Microsoft Entra ID, là dịch vụ quản lý danh tính và truy cập (Identity and Access Management - IAM) dựa trên cloud của Microsoft. Việc quản lý user trong Azure AD là một trong những kỹ năng cơ bản và quan trọng nhất mà bất kỳ Azure administrator nào cũng cần nắm vững.
Trong bài viết này, chúng ta sẽ tìm hiểu chi tiết về cách tạo, quản lý và bảo mật user accounts trong Azure Active Directory, từ những bước cơ bản đến các best practices trong thực tế.
Tại Sao User Management Quan Trọng trong Azure?
User management trong Azure AD đóng vai trò then chốt trong việc:
- Bảo mật tổ chức: Kiểm soát ai có quyền truy cập vào tài nguyên Azure
- Tuân thủ quy định: Đáp ứng các yêu cầu về compliance và audit
- Quản lý chi phí: Theo dõi và kiểm soát việc sử dụng tài nguyên
- Hợp tác hiệu quả: Cho phép team members và external partners làm việc cùng nhau
- Tự động hóa: Tích hợp với các hệ thống HR và provisioning tools
Các Loại User Accounts trong Azure AD
Azure AD hỗ trợ nhiều loại user accounts khác nhau, mỗi loại phục vụ cho mục đích riêng:
| Loại User | Mô Tả | Use Case | Domain Format |
|---|---|---|---|
| Cloud Identity | User được tạo trực tiếp trong Azure AD | Nhân viên chỉ sử dụng cloud services | user@tenant.onmicrosoft.com |
| Directory-synchronized Identity | User được đồng bộ từ on-premises AD | Hybrid environment, có cả on-prem và cloud | user@company.com |
| Guest User (External) | User từ tổ chức khác được mời vào | Collaboration với partners, vendors, contractors | user@external.com |
| Service Principal | Identity cho applications và services | Automation, app authentication | N/A |
Yêu Cầu Trước Khi Tạo User
Trước khi bắt đầu tạo user trong Azure AD, bạn cần đảm bảo:
1. Quyền Cần Thiết
Để tạo user, bạn cần có một trong các roles sau:
- Global Administrator: Quyền cao nhất, có thể làm mọi thứ
- User Administrator: Có thể tạo và quản lý users và groups
- Privileged Role Administrator: Quản lý role assignments
2. Azure AD Tenant
Bạn cần có một Azure AD tenant (directory). Khi tạo Azure subscription, một tenant mặc định sẽ được tạo tự động với domain dạng: yourname.onmicrosoft.com
3. Licensing
- Azure AD Free: Cho phép tạo unlimited users nhưng với tính năng cơ bản
- Azure AD Premium P1/P2: Cung cấp advanced features như Conditional Access, Identity Protection
Hướng Dẫn Chi Tiết: Tạo User Mới trong Azure Portal
Bước 1: Truy Cập Azure Portal
- Mở trình duyệt và truy cập: https://portal.azure.com/#home
- Đăng nhập với tài khoản có quyền administrator
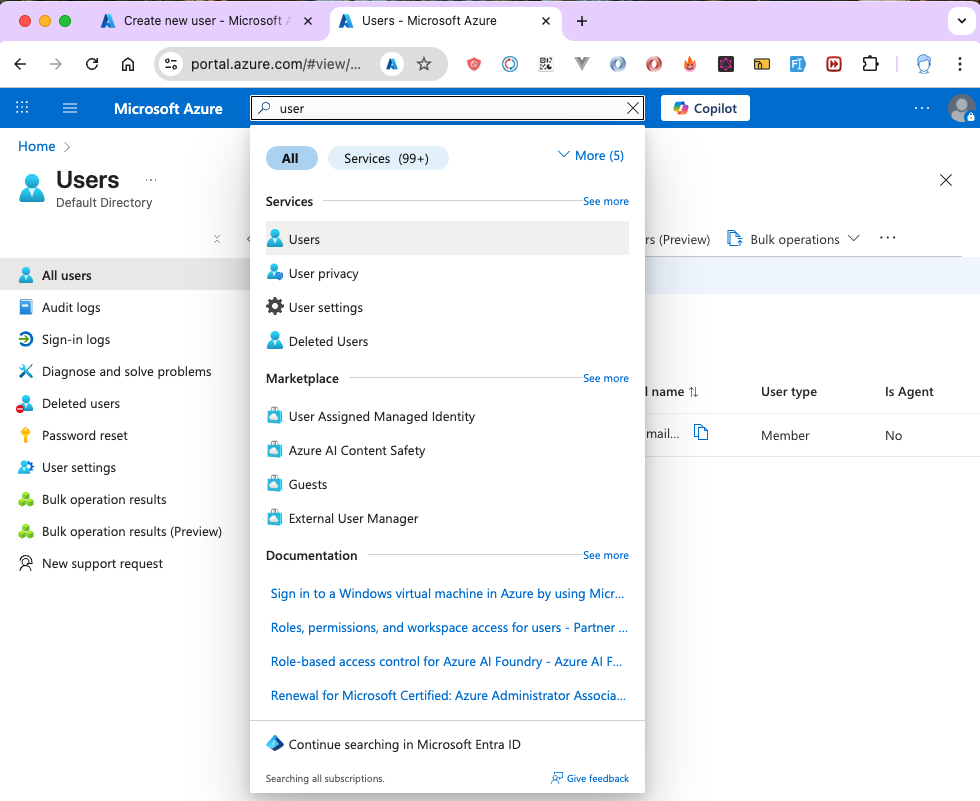
- Trong thanh search ở trên cùng, gõ "Users" hoặc "Microsoft Entra ID"
- Click vào "Users" để vào trang quản lý user
Bước 2: Khởi Tạo User Mới
Trên trang Users, bạn sẽ thấy button "+ New user". Click vào đó và bạn sẽ có 2 options:
Option 1: Create New User
Tạo user mới trực tiếp trong Azure AD của bạn. User này sẽ có identity hoàn toàn mới và được quản lý trong tenant của bạn.
Khi nào sử dụng:
- Nhân viên mới gia nhập công ty
- Test accounts
- Service accounts cho applications
Option 2: Invite External User
Mời user từ tổ chức khác (guest user). User này giữ nguyên identity của tổ chức gốc nhưng được cấp quyền truy cập vào resources của bạn.
Khi nào sử dụng:
- Collaboration với partners
- External consultants
- Vendors cần access vào specific resources

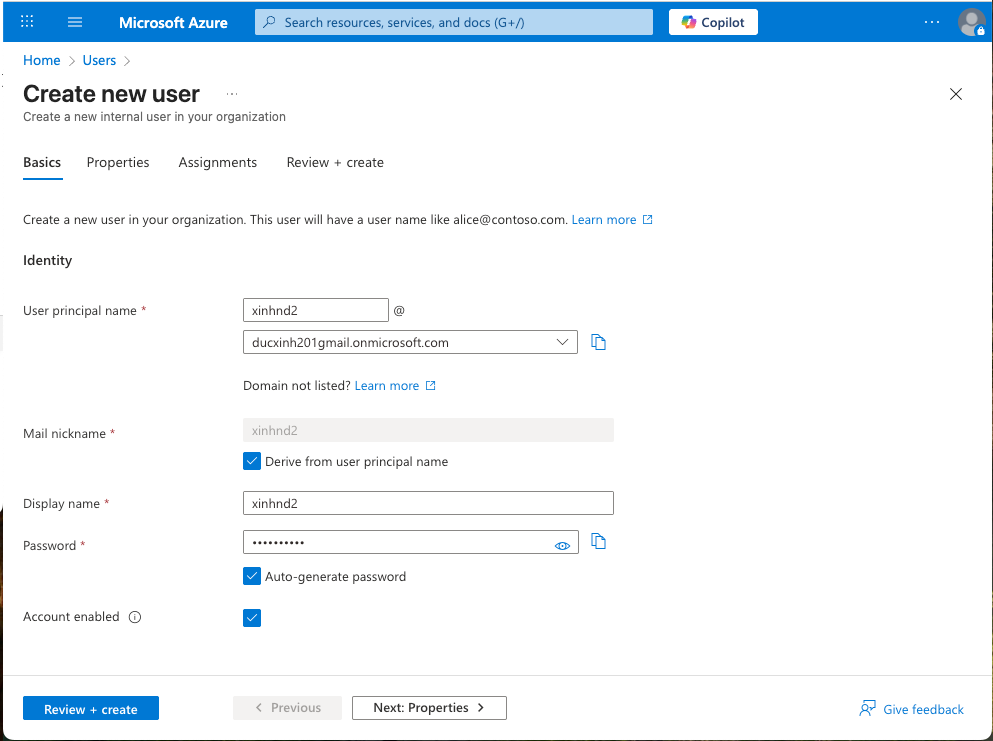
Bước 3: Điền Thông Tin Cơ Bản (Basics Tab)
Tab "Basics" chứa các thông tin bắt buộc để tạo user:
3.1. User Principal Name (UPN)
Đây là username mà user sẽ dùng để đăng nhập. Format: username@domain.onmicrosoft.com
Ví dụ:
xinhnd2@ducxinh201gmail.onmicrosoft.com
john.doe@contoso.onmicrosoft.com
admin-user@mycompany.onmicrosoft.com
Best Practices:
- Sử dụng naming convention nhất quán:
firstname.lastnamehoặcfirstnamelastname - Với admin accounts, thêm prefix:
admin-hoặc suffix:-admin - Tránh sử dụng special characters khó đọc
- Document naming convention trong organization policies
3.2. Display Name
Tên hiển thị của user trong Azure Portal, emails, và Microsoft 365 apps.
Ví dụ:
Nguyễn Đức Xinh
John Doe
IT Administrator
3.3. Password
Có 2 options:
- Auto-generate password: Azure tự động tạo password phức tạp
- Let me create the password: Tự tạo password (phải đáp ứng password policy)
Best Practices:
- Sử dụng auto-generate cho security tốt hơn
- Enable "Force password change on first login"
- Implement password rotation policy
- Educate users về password security
Bước 4: Cấu Hình Properties (Optional)
Tab "Properties" cho phép bạn thêm thông tin bổ sung như First name, Last name, Job title, Department, Contact information. Bạn có thể bỏ qua bước này hoặc điền đầy đủ để dễ dàng quản lý và tìm kiếm users sau này
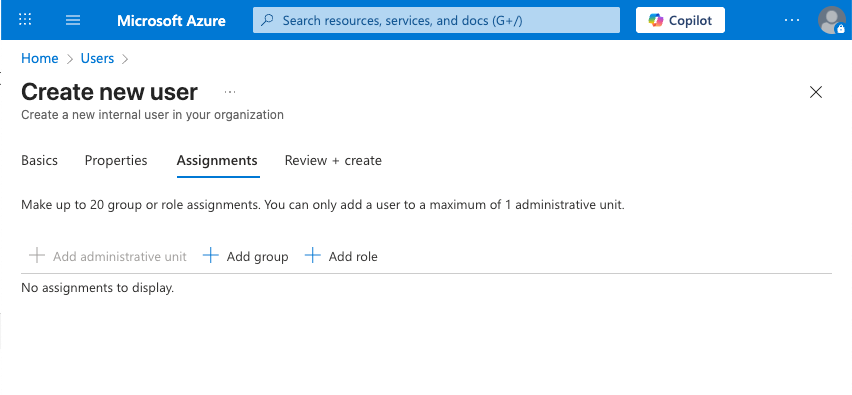
Bước 5: Assignments - Gán Groups và Roles
Tab "Assignments" là nơi bạn cấu hình quyền truy cập cho user:
5.1. Groups
Groups giúp quản lý permissions hiệu quả hơn thay vì assign permissions cho từng user.
Types of Groups:
- Security Groups: Quản lý access đến resources
- Microsoft 365 Groups: Collaboration (Teams, SharePoint, Email)
- Distribution Groups: Email distribution lists
Best Practices:
- Sử dụng groups thay vì individual permissions
- Follow naming convention:
GRP-<Purpose>-<Resource> - Example:
GRP-Developers-Production,GRP-Finance-ReadOnly
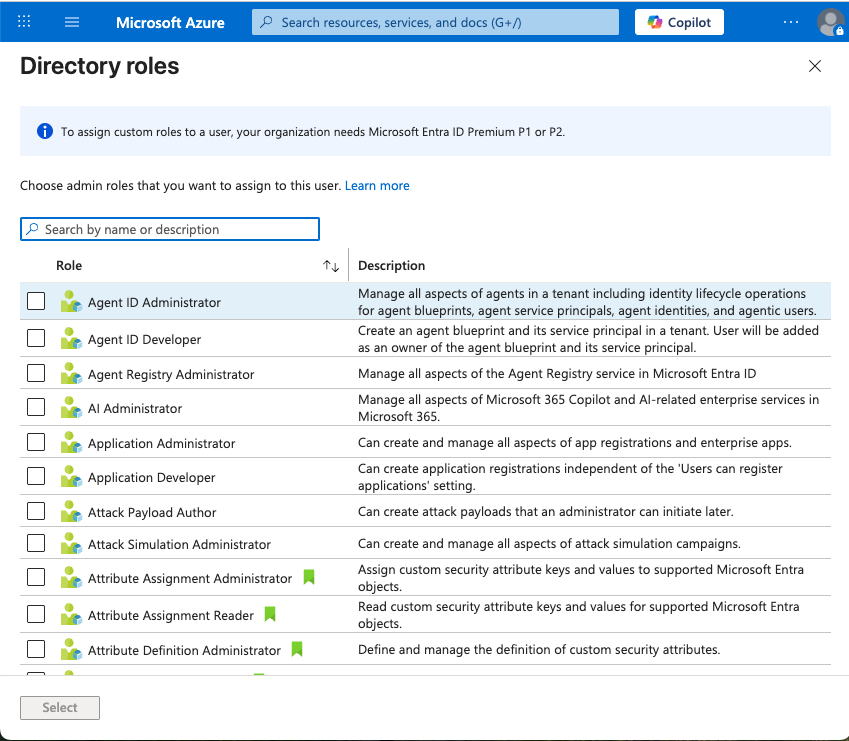
5.2. Roles
Azure AD roles define administrative permissions trong directory.
Common Roles:
| Role | Quyền | Khi Nào Sử Dụng |
|---|---|---|
| Global Administrator | Full access to all Azure AD features | CTO, IT Director (ít users nhất có thể) |
| User Administrator | Manage users và groups | HR IT Team |
| Security Administrator | Manage security features | Security Team |
| Application Administrator | Manage app registrations | DevOps Team |
| Helpdesk Administrator | Reset passwords, manage user issues | IT Support |
| Reports Reader | Read reports và audit logs | Compliance Team |
Security Best Practices:
- Principle of Least Privilege: Chỉ cấp quyền cần thiết
- Just-In-Time Access: Sử dụng Azure AD PIM cho temporary elevated access
- Separation of Duties: Không một người có too many permissions
- Regular Audits: Review role assignments hàng quý
5.3. Administrative Units
Cho phép delegate administration cho specific subsets of users (available in Premium tier).
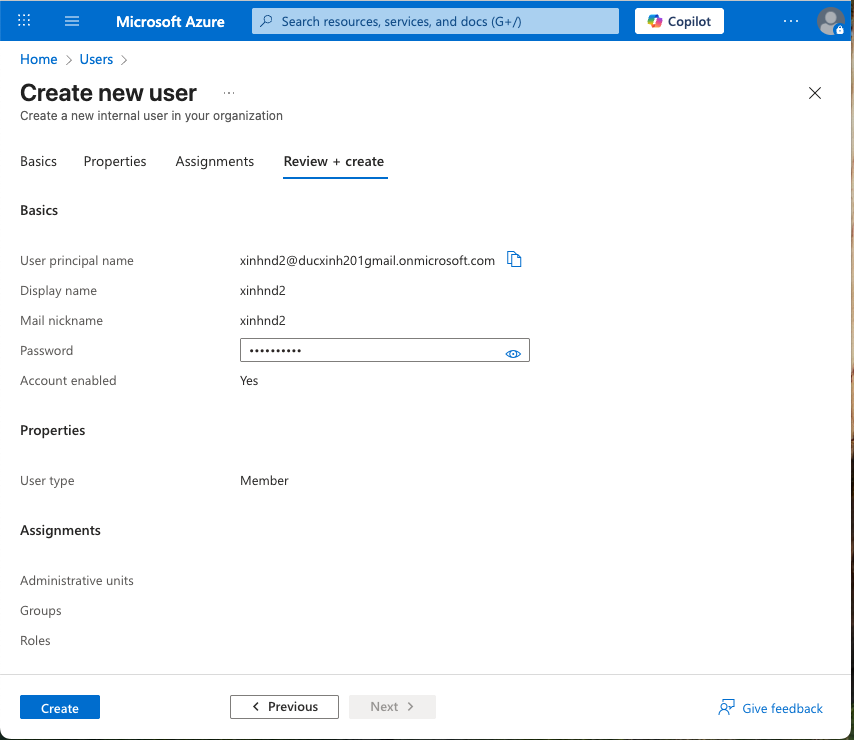
Bước 6: Review và Create
- Click tab "Review + Create"
- Kiểm tra lại tất cả thông tin đã nhập
- Ensure all required fields are correct
- Click "Create" để hoàn tất
Sau khi click Create:
- User được tạo ngay lập tức
- Temporary password được hiển thị (save it!)
- User có thể login immediately
- Azure gửi welcome email (nếu cấu hình)
Verify User Creation
1. Kiểm Tra Trong User List
Sau khi tạo xong, quay lại trang Users để verify:
- User mới xuất hiện trong danh sách
- Check status: "Active"
- Verify User Principal Name correct
- Check assigned groups và roles
Troubleshooting:
- Nếu không thấy user: Refresh trang hoặc clear filter
- Nếu không có roles: User sẽ có quyền rất limited
2. Test Login với User Mới
Đây là bước quan trọng nhất để đảm bảo user hoạt động đúng:
2.1. Login Process
- Mở incognito/private browser window
- Truy cập: https://portal.azure.com/
- Login với credentials:
- Username:
xinhnd2@ducxinh201gmail.onmicrosoft.com - Password: Temporary password từ lúc tạo
- Username:
Format của Username:
[username]@[tenant-name].onmicrosoft.com

Ví dụ:
xinhnd2@ducxinh201gmail.onmicrosoft.com
john.doe@contoso.onmicrosoft.com
Trong đó:
xinhnd2: User principal name bạn đã tạoducxinh201gmail: Tenant name (unique trong Azure AD).onmicrosoft.com: Default domain suffix
2.2. First Login Experience
Lần đầu tiên login, user sẽ trải qua các bước sau:
Step 1: Password Change
Step 2: Multi-Factor Authentication (MFA) Setup Azure có thể yêu cầu setup MFA (tùy thuộc vào security policies):
Options cho MFA:
- Microsoft Authenticator App (Recommended)
- Chrome Authenticator Extension
- Phone/SMS Verification
- Email Verification
- Security Key (FIDO2)
3. Verify Permissions
Sau khi login thành công, test permissions của user:
# Check what user can see:
1. Navigate to "All resources"
2. Check accessible subscriptions
3. Try to view specific resources
4. Attempt actions based on assigned roles
Expected Behavior Based on Roles:
Nếu KHÔNG được gán role/permissions:
Error: "An error occurred when trying to fetch resources.
(Code: AccessDenied) Access is denied to the requested resource.
The user might not have enough permission."
Nếu có Reader role:
- Có thể view resources
- Không thể modify anything
- Có thể view monitoring data
Nếu có Contributor role:
- Có thể view và modify resources
- Không thể manage access permissions
- Có thể create/delete resources
Nếu có Owner role:
- Full access to resources
- Có thể manage permissions
- Có thể delegate access to others
Common Errors và Troubleshooting
Error 1: Access Denied
Error: "Access is denied to the requested resource.
The user might not have enough permission."
Nguyên nhân:
- User chưa được gán roles
- User không có permissions trên subscription/resource group
- Conditional Access policy blocking
Giải pháp:
- Assign appropriate Azure roles (Reader, Contributor, Owner)
- Add user to subscription/resource group
- Check Conditional Access policies
- Wait for permissions to propagate (có thể mất 5-10 phút)
Error 2: License Issues
Error: "A license is required to use this feature"
Giải pháp:
- Go to Azure AD > Users > [User] > Licenses
- Click "+ Assign"
- Select appropriate license (Azure AD Premium, Microsoft 365, etc.)
- Save changes
Best Practices cho User Management
1. Naming Conventions
User Principal Names:
# Good Examples:
firstname.lastname@company.onmicrosoft.com
first.last@company.onmicrosoft.com
flastname@company.onmicrosoft.com

# Admin Accounts:
admin-firstname.lastname@company.onmicrosoft.com
firstname.lastname-admin@company.onmicrosoft.com

# Service Accounts:
svc-appname@company.onmicrosoft.com
app-servicename@company.onmicrosoft.com
2. Security Best Practices
Password Policy:
- Enable self-service password reset (SSPR)
- Implement password expiration (30-90 days)
- Use banned password list
- Enable Azure AD Password Protection
Multi-Factor Authentication:
Mandatory MFA for:
  - All admin accounts
  - Access to production environments
  - Remote access
  - Sensitive data access

Recommended MFA Methods:
  1. Microsoft Authenticator (passwordless)
  2. FIDO2 Security Keys
  3. Windows Hello for Business
  4. Phone/SMS (least secure, only as backup)
Conditional Access:
Create policies for:
  - Block legacy authentication
  - Require MFA for admins
  - Require compliant devices
  - Block access from untrusted locations
  - Require terms of use acceptance
3. Lifecycle Management
Onboarding:
1. Create user account
2. Assign to appropriate groups
3. Provision licenses
4. Setup MFA
5. Grant resource access
6. Send welcome email với training materials
Offboarding:
1. Disable account immediately
2. Remove from all groups
3. Revoke licenses
4. Transfer data ownership
5. Backup user data
6. Delete account after retention period (30-90 days)
Regular Maintenance:
- Review inactive accounts monthly
- Audit privileged accounts quarterly
- Update emergency access accounts
- Review guest user access annually
- Clean up orphaned accounts
4. Documentation
Maintain documentation for:
- User provisioning procedures
- Naming conventions
- Role assignment matrix
- Emergency access procedures
- Compliance requirements
- Contact information
So Sánh với Các Cloud Providers Khác
| Feature | Azure AD | AWS IAM | Google Cloud IAM |
|---|---|---|---|
| User Management | Rich features với Entra ID | Programmatic focus | Tích hợp Google Workspace |
| MFA Support | Excellent (Authenticator, FIDO2) | Good (Virtual MFA, Hardware) | Good (Google Authenticator) |
| External Collaboration | Excellent (B2B) | Limited (Cross-account) | Good (Cloud Identity) |
| GUI Experience | Excellent Azure Portal | Good AWS Console | Good Cloud Console |
| Hybrid Support | Excellent (AD Connect) | Limited | Limited |
| Pricing | Free tier + Premium ($6-$9/user) | Free (pay for usage) | Free tier + Premium |
| Learning Curve | Medium | Steep | Medium |
| Enterprise Integration | Excellent (Microsoft ecosystem) | Good | Good (Google ecosystem) |
Monitoring và Auditing
1. Sign-in Logs
Monitor user authentication:
Location: Azure AD > Monitoring > Sign-in logs

Track:
  - Successful logins
  - Failed attempts
  - Location và device info
  - Application accessed
  - Conditional Access results
2. Audit Logs
Track changes to directory:
Location: Azure AD > Monitoring > Audit logs

Monitor:
  - User creation/deletion
  - Role assignments
  - Group changes
  - Policy modifications
  - Admin actions
3. Alerts
Setup alerts cho suspicious activities:
- Multiple failed login attempts
- Login từ unusual locations
- Privileged role assignments
- Bulk user operations
- Disabled MFA
Kết Luận
Việc quản lý users trong Azure Active Directory là một kỹ năng quan trọng và cần thiết cho mọi Azure administrator. Từ việc tạo user cơ bản đến implementation các advanced security features, mỗi bước đều đóng vai trò quan trọng trong việc bảo mật và quản lý hiệu quả môi trường cloud của bạn.
Key Takeaways:
- Security First: Luôn implement MFA và Conditional Access
- Principle of Least Privilege: Chỉ cấp permissions cần thiết
- Automation: Sử dụng bulk operations và dynamic groups
- Documentation: Maintain clear procedures và policies
- Regular Reviews: Audit users và permissions định kỳ
- Lifecycle Management: Có process rõ ràng cho onboarding/offboarding
Next Steps:
Sau khi đã nắm vững user management basics, bạn có thể explore:
- Azure AD Privileged Identity Management (PIM): Just-in-time access
- Conditional Access Policies: Advanced access control
- Azure AD Identity Protection: AI-powered security
- Azure AD Connect: Hybrid identity synchronization
- Application Integration: SSO with enterprise applications
Tài Liệu Tham Khảo:
Bằng cách follow các best practices và guidelines trong bài viết này, bạn sẽ có thể build một identity management system an toàn, scalable, và hiệu quả cho organization của mình trên Azure cloud platform.