
- Authors

- Name
- Nguyễn Đức Xinh
- Published on
- Published on
Move Thousands of iPhone Photos and Videos to Mac, No Hangs
AirDrop is fine for moving a few dozen photos from your iPhone to your Mac. But once your library grows to tens of gigabytes, with tens of thousands of photos and thousands of 4K videos, everything changes: AirDrop hangs, iCloud takes all day to sync, and the Photos app builds a huge library on a MacBook drive that is already short on space.
This guide is based on a real transfer: 58 GiB of photos and videos from an iPhone 11 to an external SSD connected to a MacBook, using Image Capture, an app that comes with every Mac. You will learn how to prepare, pick the right method, select tens of thousands of photos quickly and resume when the import stops halfway. No Terminal and no extra software needed.
Quick summary: Connect the cable, turn off Auto-Lock on the iPhone, choose "Keep Originals", open Image Capture, choose a destination folder on a drive with enough space, then click Download All. The rest of this guide helps you do this safely with large amounts of data.
1. Why are large transfers harder than you think?
With small amounts of data, any method works. Once you pass 10–20 GiB, a few problems start to show up:
- It takes a long time: 58 GiB at an average of 15 MB/s takes more than an hour. During that time, the iPhone locking its screen, the Mac going to sleep or a loose cable is enough to interrupt the transfer.
- Photos stored in iCloud: With Optimize iPhone Storage turned on, many photos on the phone are only small previews. The originals must be downloaded from iCloud before they can be copied, so the transfer often "freezes" on those files.
- Not enough space on the destination: A 256 GB MacBook usually does not have room for 60 GiB of data plus a Photos library.
- Hard to know how long is left: Image Capture shows only a generic progress bar, with no speed or estimated finish time.
- Hard to verify the result: After copying tens of thousands of files, how do you know which ones failed or are missing?
The sections below address these problems one by one.
2. Comparing ways to transfer photos and videos from iPhone to Mac
Before you start, choose the right tool. The table below compares common methods for large libraries:
| Method | Connection | Good for large data | Choose destination folder | Keeps originals | Notes |
|---|---|---|---|---|---|
| Image Capture | Cable | ⭐⭐⭐⭐⭐ | Yes, including external drives | Yes | Built into macOS, copies as regular files |
| Photos app | Cable | ⭐⭐⭐ | No, imports into the Photos library | Yes | Uses extra space, hard to get files back out |
| AirDrop | Wi-Fi + Bluetooth | ⭐⭐ | Downloads folder by default | Yes | Tends to hang with thousands of photos |
| iCloud Photos | Internet | ⭐⭐ | No | Yes | Depends on network speed and iCloud plan |
| Finder | Cable | ⭐ | – | – | Sync only, cannot copy directly from the Camera Roll |
| Third-party apps (iMazing…) | Cable / Wi-Fi | ⭐⭐⭐⭐ | Yes | Yes | Feature-rich but usually paid |
Bottom line: For tens of gigabytes, Image Capture over a cable is the best balance. It is free, already installed, lets you pick any destination folder (including an external SSD), and produces regular files you can organize, back up or move to a NAS however you like.
3. Preparation before transferring (don't skip this)
With large transfers, 10 minutes of preparation can save you hours of redoing work. Here is the checklist from my 58 GiB transfer.
3.1. Check the total size of your photo library
On the iPhone, go to Settings → General → iPhone Storage → Photos. This number is the total size of your photos and videos. Use it to estimate the transfer time and prepare the destination drive.
Note: the size shown on the iPhone and on the Mac may differ by a few percent because they use different units (GB vs GiB). This is normal.
3.2. Turn off "Optimize iPhone Storage"
Go to Settings → [Your Name] → iCloud → Photos and switch to Download and Keep Originals. Then keep the iPhone on Wi-Fi and charging until the download finishes. If you skip this step, Image Capture has to wait for each file to download from iCloud and can easily hang or show errors halfway.
3.3. Choose the transfer format: keep originals
Go to Settings → Photos → Transfer to Mac or PC:
| Option | Meaning | When to use |
|---|---|---|
| Automatic | The iPhone converts HEIC → JPG and HEVC → H.264 during transfer | The destination cannot read HEIC |
| Keep Originals | Copies the original HEIC/HEVC files | Recommended for Mac: faster, smaller, no quality loss |
For large transfers, choose Keep Originals. Converting on the iPhone slows the transfer down and makes files bigger (JPG is usually about 1.5–2 times the size of HEIC).
3.4. Keep the iPhone from locking
Go to Settings → Display & Brightness → Auto-Lock → Never.
- If Low Power Mode is on, Auto-Lock is fixed at 30 seconds. Turn it off in Settings → Battery.
- Turn the screen brightness all the way down so the iPhone stays cooler.
- Remember to set Auto-Lock back after the transfer.
3.5. Keep the Mac awake
Locking the Mac's screen does not stop the copy, but the Mac going to sleep does. To stop the Mac from sleeping while it is plugged in:
- macOS Sonoma / Sequoia and later: go to System Settings → Battery → Options… and turn on "Prevent automatic sleeping on power adapter when the display is off".
- Desktop Macs (iMac, Mac mini): go to System Settings → Energy and turn on the similar option.
Also: plug in your MacBook and don't close the lid (unless you use an external display).
3.6. Prepare the destination drive
| Destination | Advantages | Notes |
|---|---|---|
| Mac's internal SSD | Fastest | Needs free space of at least total size × 1.2 |
| External SSD (USB-C) | Fast, doesn't use internal space | Format as APFS or exFAT |
| External HDD | Cheap, large capacity | Slower with tens of thousands of small files |
| FAT32 formatted drive | – | ❌ Don't use: 4 GB per-file limit, long 4K videos will fail |
To check a drive's free space and format: open Finder, right-click the drive in the sidebar and choose Get Info. The window shows the Format (APFS, ExFAT, MS-DOS FAT32…) and Available (free space).
3.7. Cables and ports
Transfer speed depends heavily on the iPhone's connection standard:
| iPhone model | Port | USB standard | Theoretical speed | Real-world with Image Capture* |
|---|---|---|---|---|
| iPhone 14 and earlier | Lightning | USB 2.0 | 480 Mbps (~60 MB/s) | ~10–30 MB/s |
| iPhone 15 / 16 (standard models) | USB-C | USB 2.0 | 480 Mbps | ~10–30 MB/s |
| iPhone 15 Pro and later (Pro models) | USB-C | USB 3 | 10 Gbps | Noticeably faster with a USB 3 cable |
* Real-world speed varies a lot: large videos copy much faster than thousands of small photos. My transfer from an iPhone 11 averaged about 15 MB/s, peaking at about 30 MB/s.
Tips:
- Use an Apple or MFi-certified cable and plug it directly into the Mac, avoiding cheap USB hubs.
- On Pro iPhones with USB-C, the included charging cable is only USB 2.0. To get USB 3 speeds you need to buy a separate USB 3 (10 Gbps) cable.
3.8. Estimate the transfer time
Use this table to estimate ahead of time:
| Size | 10 MB/s | 15 MB/s | 25 MB/s | 100 MB/s (USB 3) |
|---|---|---|---|---|
| 10 GiB | ~17 min | ~11 min | ~7 min | ~2 min |
| 30 GiB | ~51 min | ~34 min | ~20 min | ~5 min |
| 60 GiB | ~1 h 42 min | ~1 h 8 min | ~41 min | ~10 min |
| 120 GiB | ~3 h 25 min | ~2 h 17 min | ~1 h 22 min | ~20 min |
4. Step-by-step: transfer photos and videos with Image Capture
Step 1: Connect and trust the computer
- Connect the iPhone to the Mac with a cable.
- Unlock the iPhone. When "Trust This Computer?" appears, tap Trust and enter your passcode.
Step 2: Open Image Capture
Press Cmd + Space, type Image Capture and press Enter. You can also find it in Applications. In the left column, select your iPhone under Devices.
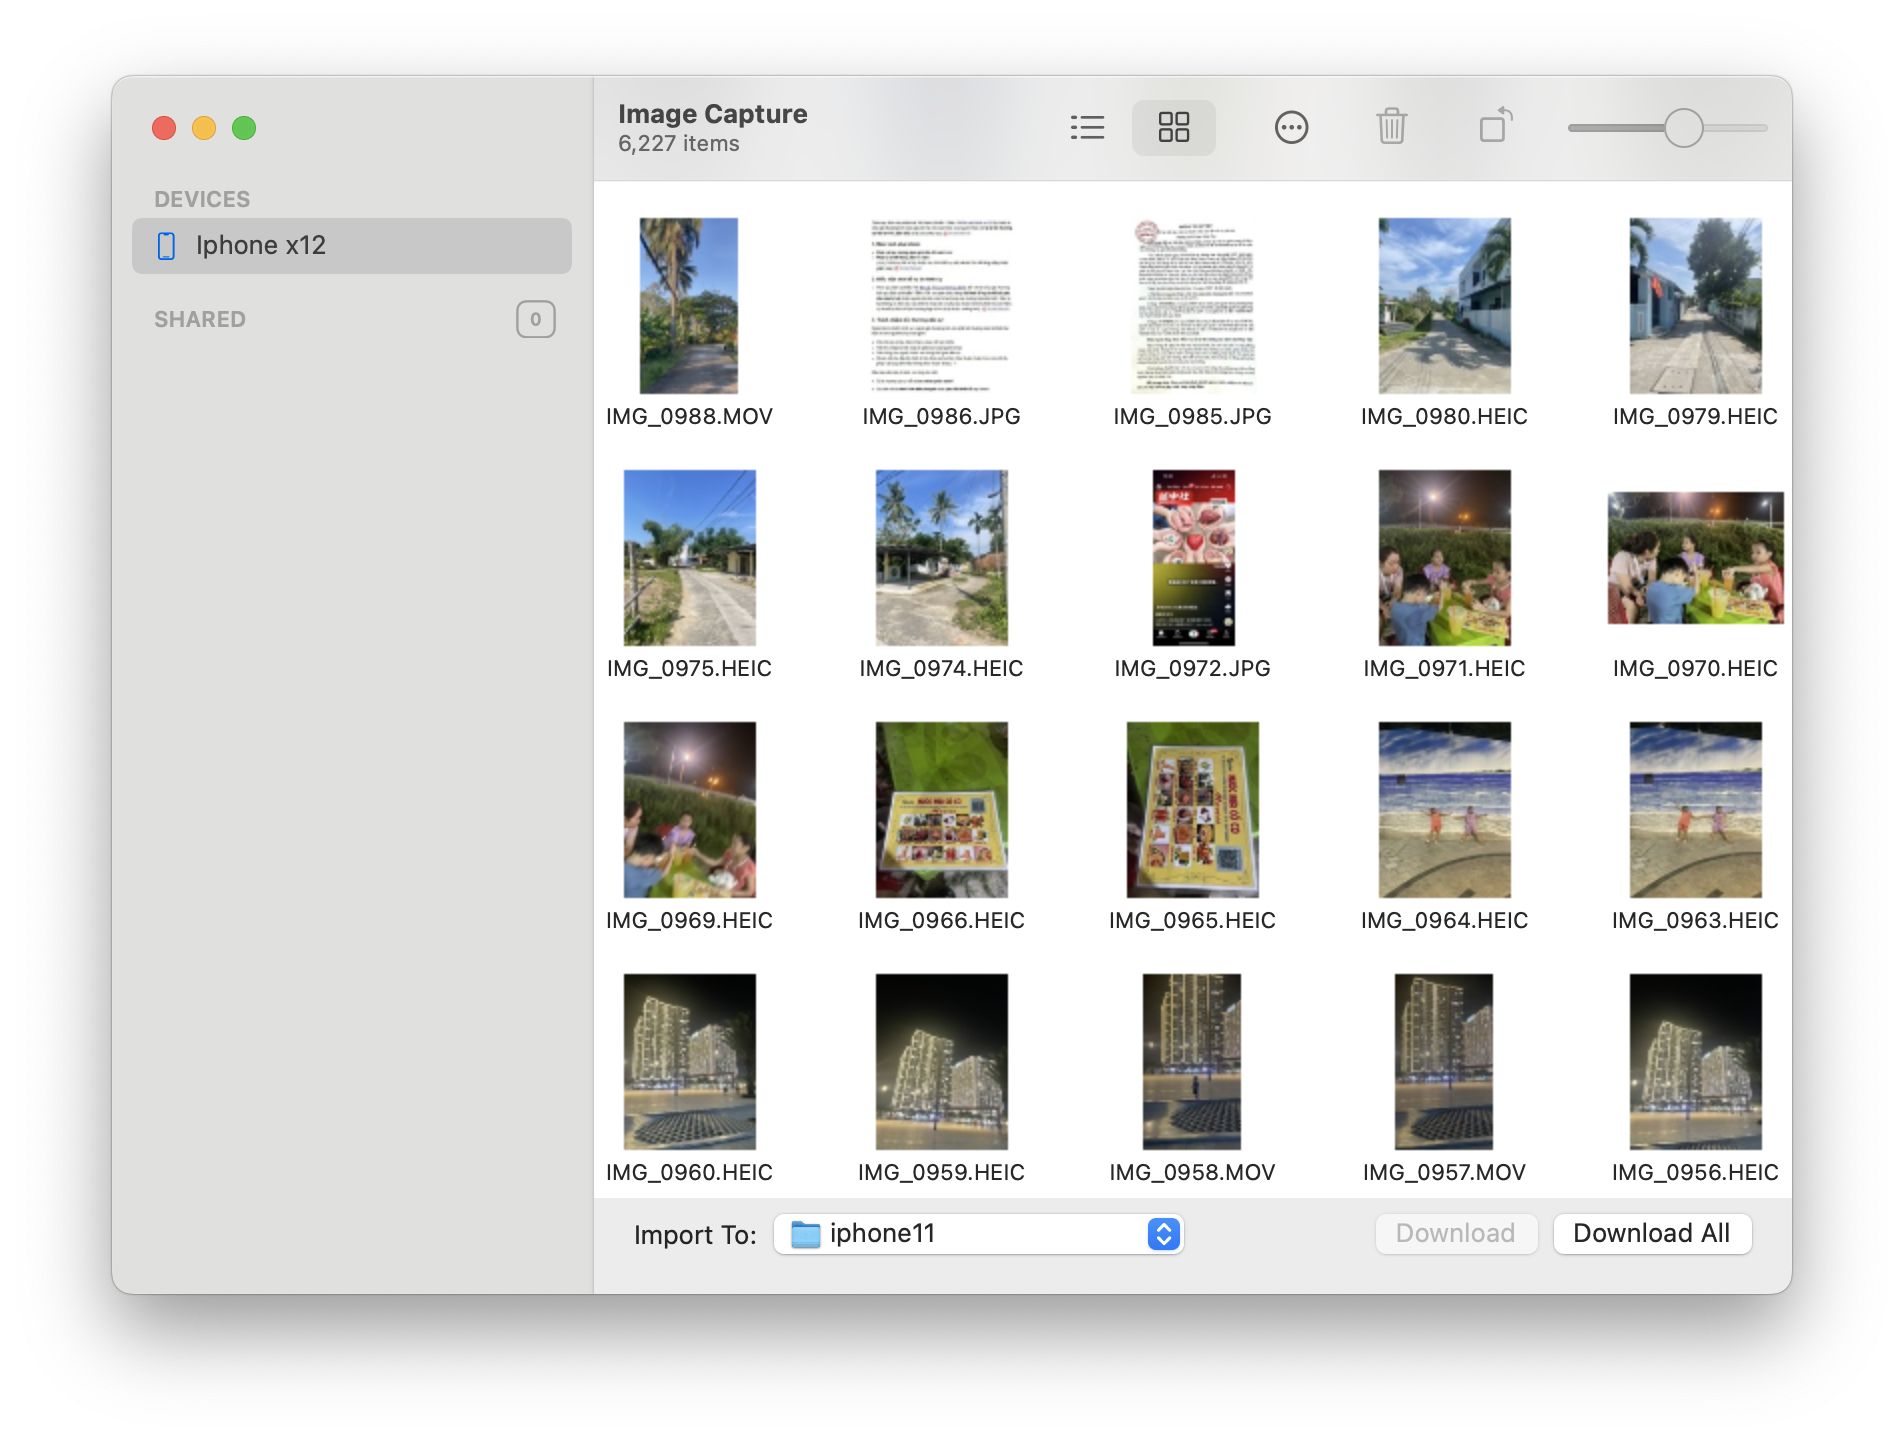
Image Capture before downloading: select the iPhone in the left column, choose the destination in "Import To", then click "Download All". No photos have a ✓ yet.
The first time, Image Capture may take a few minutes to read a list of tens of thousands of photos. Wait until the item count at the top stops increasing.
Step 3: Configure before downloading
In the bar at the bottom of the window:
- Import To: choose Other… and pick the destination folder, for example
/Volumes/MyDisk/iphone-backup/iphone11. Use a separate folder for each iPhone. - Delete after import: ❌ Leave it unchecked. Only delete photos from the iPhone after checking carefully and having at least one more backup.
- You can switch to list view to see file names, dates and sizes.
Step 4: Download
- To copy everything: click Download All.
- To copy in batches: select photos by date range (click the first photo, hold
Shiftand click the last one) and click Download.
For large libraries, batches of about 10–20 GiB (for example by year) make it easier to check and redo a batch if something goes wrong.
Keyboard shortcuts for fast selection in Image Capture
With tens of thousands of photos, clicking them one by one is not realistic. Image Capture supports the usual macOS selection shortcuts:
| Action | Shortcut |
|---|---|
| Select all | Cmd + A |
| Select a continuous range | Click the first photo, hold Shift, click the last one |
| Add or remove individual photos | Hold Cmd and click |
| Select almost everything except a few | Cmd + A, then hold Cmd and click the photos to exclude |
| List view (name, date, size) | List view button in the toolbar |
If the import stops halfway, use Shift + click to select the rest (see Step 6).
Step 5: Leave it alone and keep an eye on it
While copying:
- Don't unplug the cable, and don't open the Camera or Photos app on the iPhone.
- Don't open the Photos app on the Mac, as it can compete with Image Capture for access to the device.
- Photos that finish copying get a green ✓ in Image Capture.
- An "Importing
" box with a progress bar appears in the middle of the window. The Cancel button at the bottom stops the import.
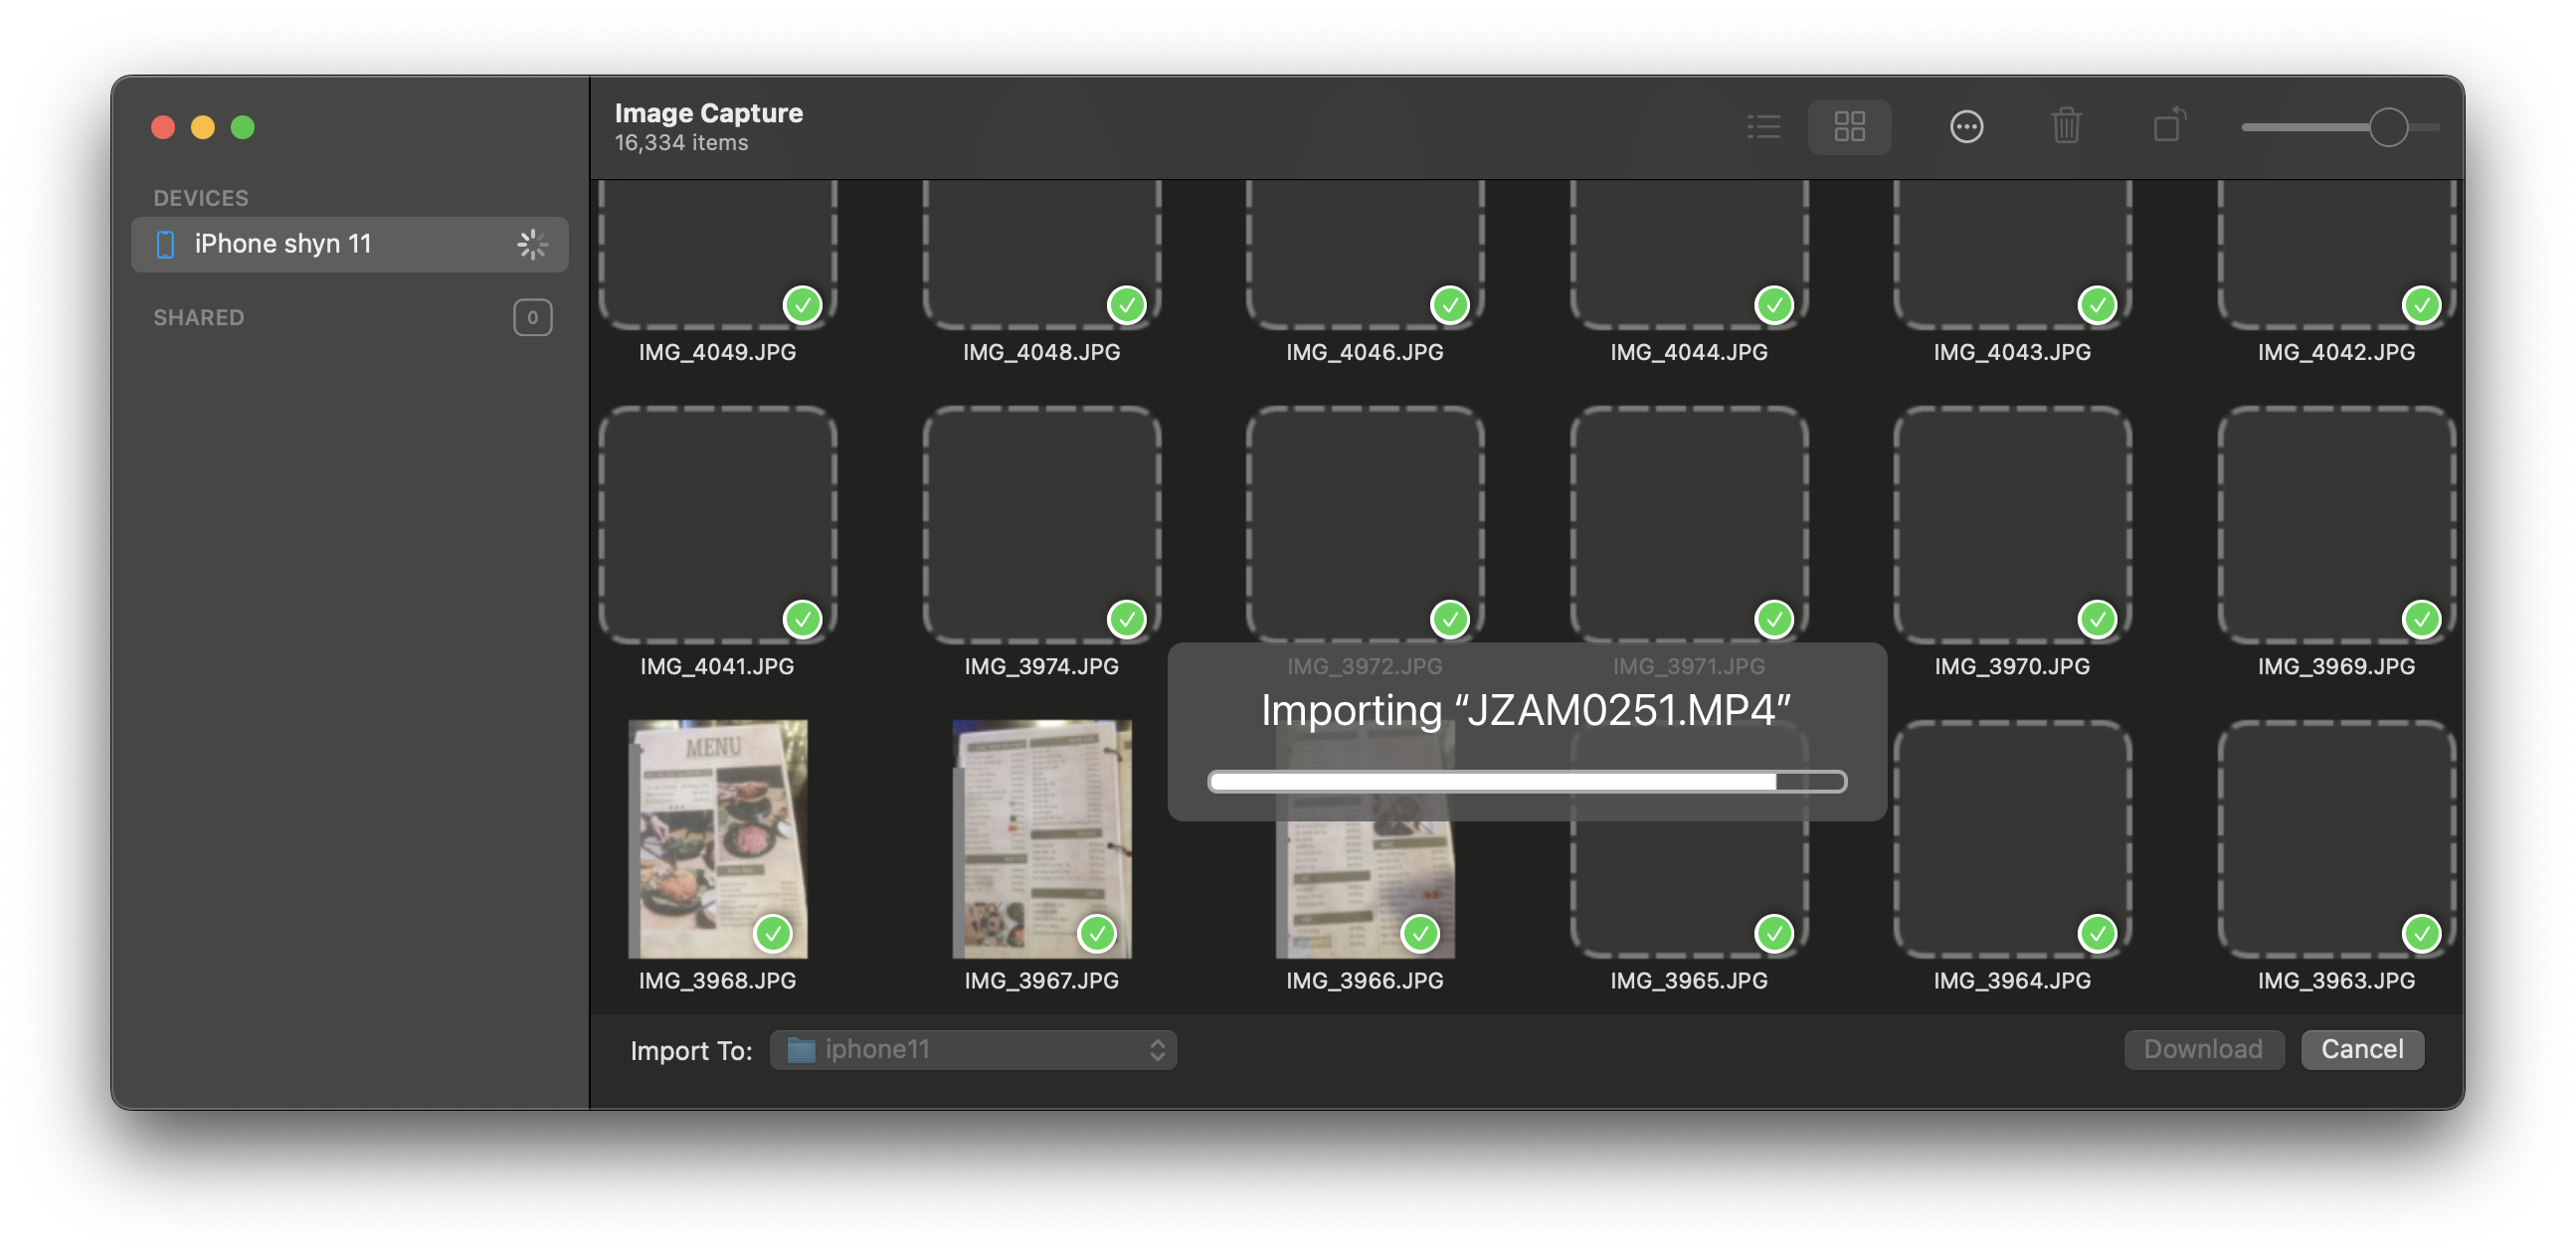
Running Download All: downloaded photos have a green ✓, and the "Importing…" box shows the file being copied. If the file name in this box doesn't change for several minutes, the import has hung. See Step 6.
Step 6: Resume after the import stops halfway
If the import hangs or gets interrupted, you don't need to start over. Switch to list view, click the first photo without a ✓, scroll to the end of the list, hold Shift and click the last photo. With a single action, you select everything that's left, which may be thousands of photos. Then click Download to continue. If the range includes a file that caused the hang, hold Cmd and click that file to deselect it before downloading.
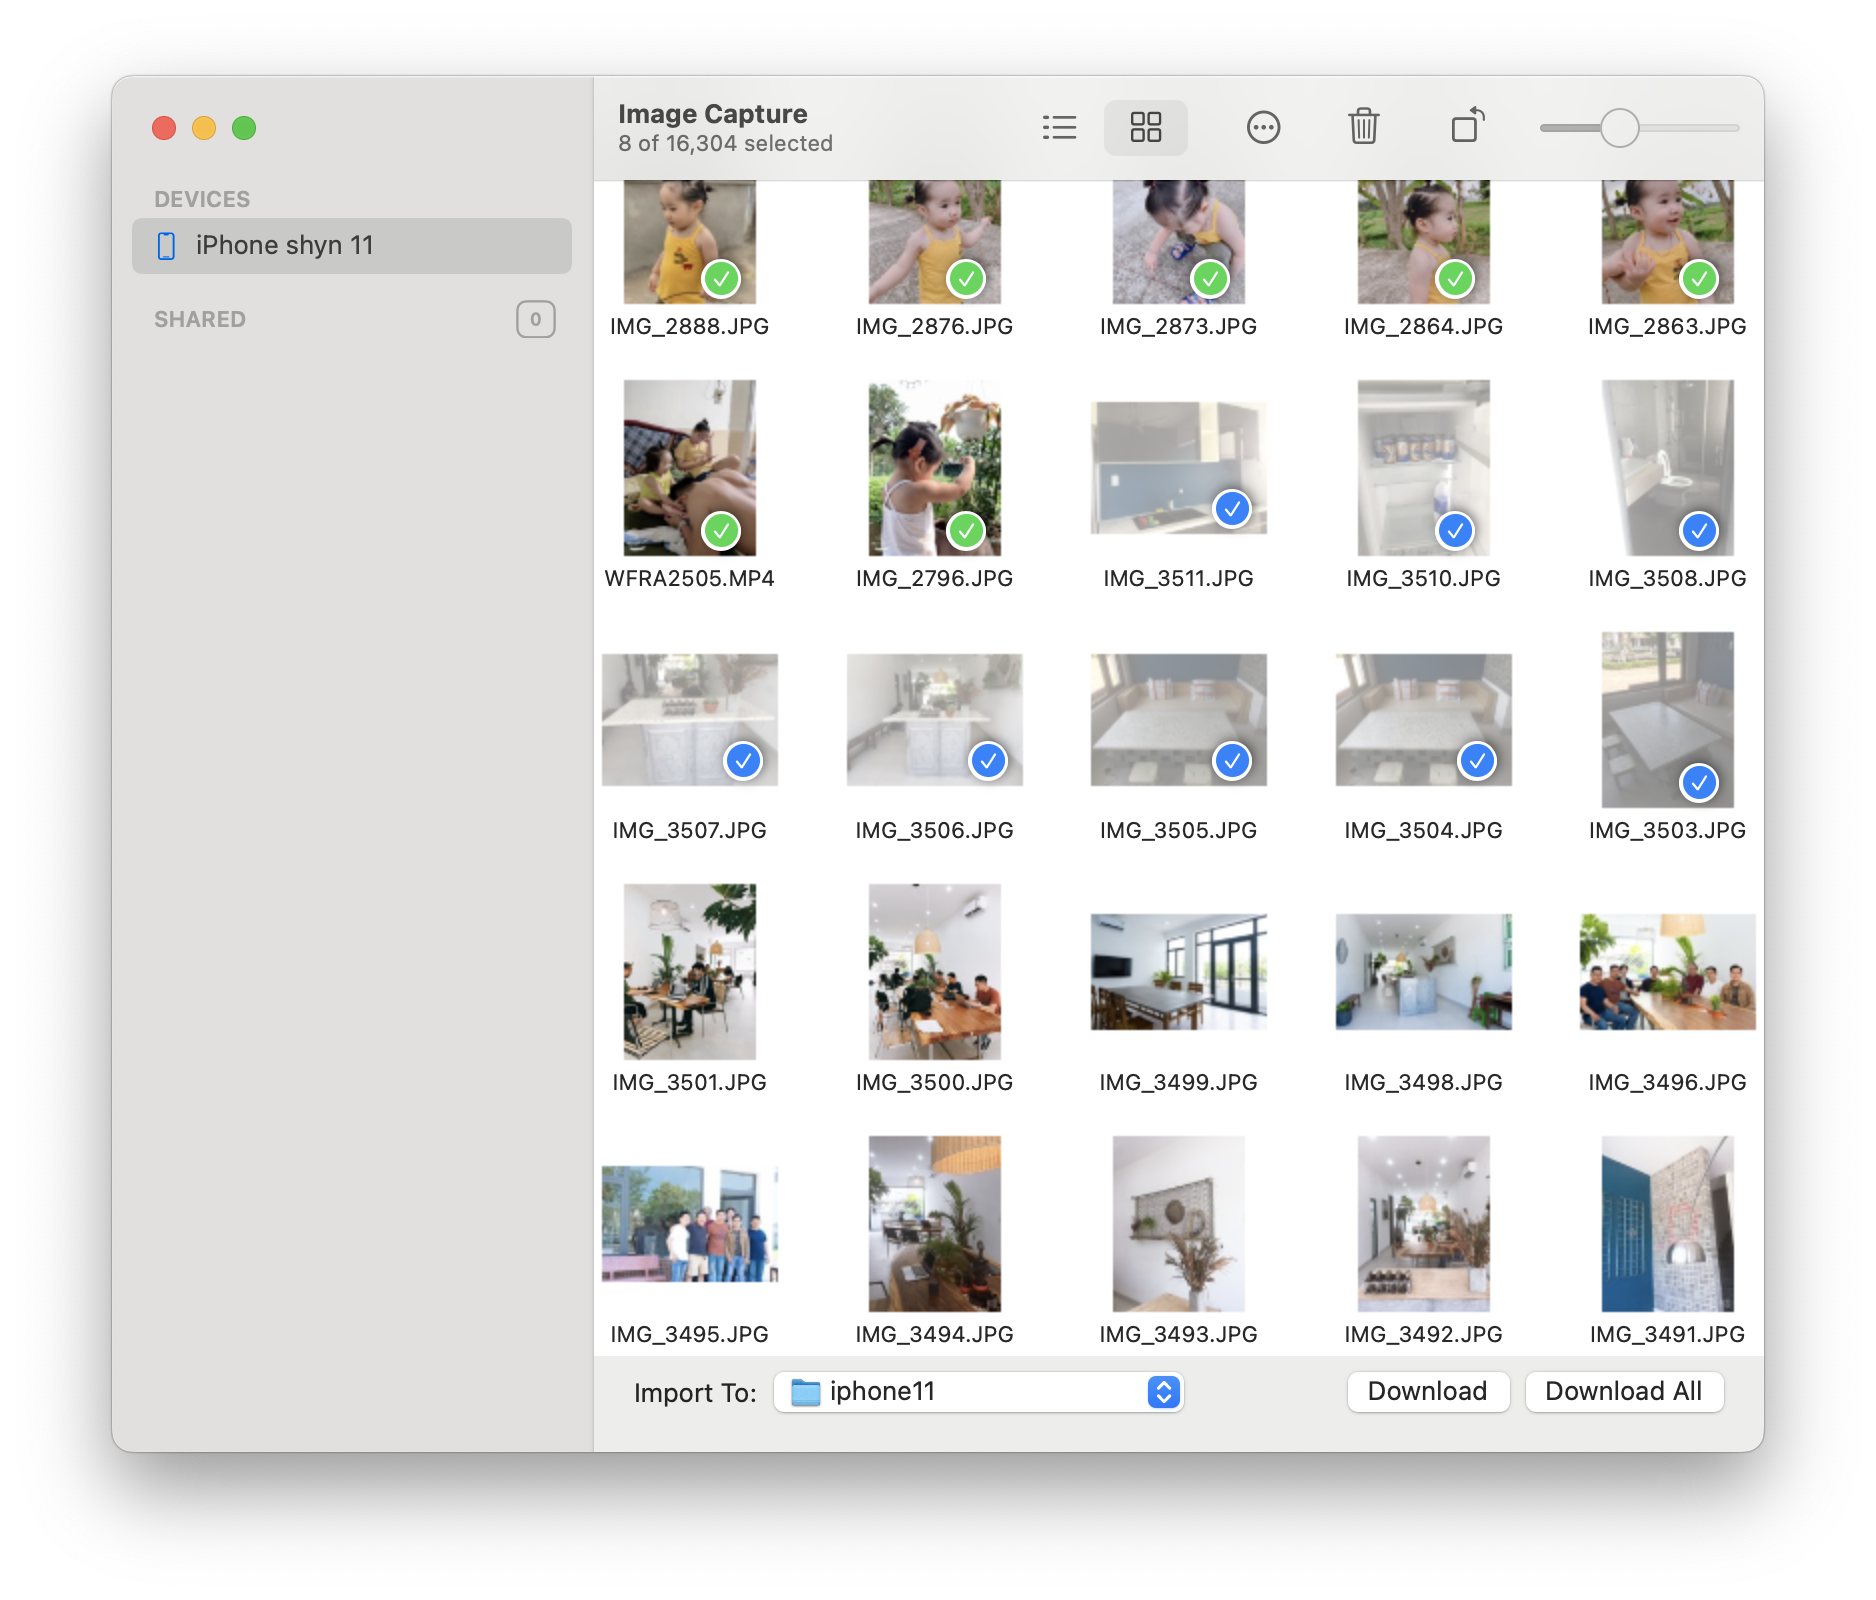
Resuming after an interruption: photos with a green ✓ are already downloaded, photos with a blue ✓ are selected to download next. The "x of 16,304 selected" line at the top shows how many are selected. Then click Download (not Download All).
If it hangs on one specific file (often a video saved from WhatsApp, Messenger or another app whose original is still in iCloud):
- Click Cancel, quit Image Capture (
Cmd + Q), unplug the cable and plug it back in. - On the iPhone, find and open that video so the phone downloads the original from iCloud.
- Reopen Image Capture and select the remaining photos as above. If it still hangs, deselect that file and transfer it separately later via AirDrop.
Image Capture has no "show only items not yet imported" filter, so
Shift+ click is the fastest way to copy the rest without creating duplicates.
5. Best practices for backing up a large iPhone library
- Follow the 3-2-1 rule: keep 3 copies, on 2 different types of storage, with 1 copy stored off-site (in the cloud or on a drive kept at a relative's house).
- Don't check "Delete after import", and only delete photos from the iPhone after checking the photo count on the Mac and making a second backup.
- One folder per iPhone, with a date in the name (for example
iphone11-2026-11), so repeated backups stay easy to manage. - Split by year if you have more than 50 GiB, so each copy session takes no more than 30–60 minutes.
- Keep the original HEIC/HEVC files instead of converting. They are smaller and keep all metadata (capture date, GPS location, Live Photos).
- Check the "Importing…" box from time to time: if the file name hasn't changed for several minutes, the import has hung. Handle it as in Step 6.
- Restore your settings afterwards: Auto-Lock, Low Power Mode and the iCloud Photos option, so the iPhone doesn't drain its battery.
6. Frequently asked questions (FAQ)
Does Image Capture reduce photo quality?
No. With Keep Originals, files are copied byte for byte, including EXIF metadata.
Can I resume after the copy is interrupted?
Yes. Image Capture marks downloaded photos with a ✓. Click the first photo without a ✓, hold Shift, click the last photo, then click Download.
Why do I see a photo or video in Image Capture that I can't find on the iPhone?
Videos saved from other apps (with names like QWHJ4301.MP4) are sorted by their original recording date in the Photos app, so they may appear somewhere completely different from their position in Image Capture. Try sorting the library by "Recently Added", or check the Hidden album (Image Capture can still see hidden photos).
Why are there more files on the Mac than photos on the iPhone?
Live Photos are split into a photo and a video, and there are also .AAE files that store edit information.
Do I need to install any software?
No. Image Capture comes with every Mac.
Does this work with an iPad?
Yes. The steps are exactly the same as for the iPhone.
7. Conclusion
Moving tens of gigabytes of photos and videos from an iPhone to a Mac does not require paid software. Image Capture is on every Mac, lets you choose a destination on an external drive and keeps the original files, which makes it the best tool for large libraries. What matters most is the preparation: download the originals from iCloud to the iPhone, turn off Auto-Lock, keep the Mac awake and make sure the destination drive has enough space. If the import stops halfway, a single Shift + click lets you continue with the rest.
In the 58 GiB transfer described here, the average speed was about 15 MB/s, or roughly 1–1.5 hours without interruptions. The only problem was a hang on one video saved from another app, and it took just a few clicks to resume the rest.
References: